
A campaign is a message you send specifically using Peer to Peer. Administrators and Managers can create new campaigns.
To create a new Peer to Peer campaign:
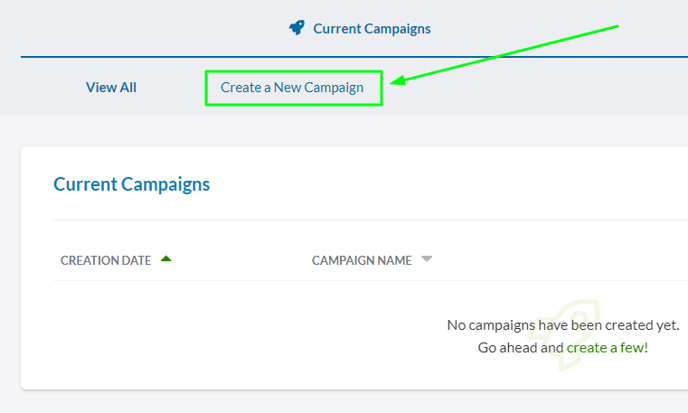
1. Go to the Messages section of your menu and select the Peer to Peer option (if you don't see the Peer to Peer option, you still need to set it up ).
2. Select the Create a New Campaign button.
We'll break the rest of these steps down into more detail.
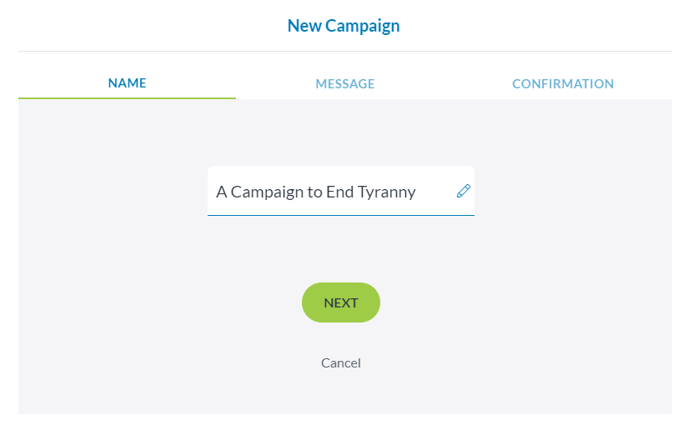
3. Name your campaign
This is for internal identification purposes only and will not appear to recipients in any way.
We recommend that you keep your campaign names unique so that you can quickly find the campaign you’re looking for and don’t get too confused.
4. Pick your Recipients
You have two options when it comes to selecting who you want to send your campaign to. Either select a saved group, or upload recipients right there. We do not recommend sending to saved groups over 5,000 contacts.
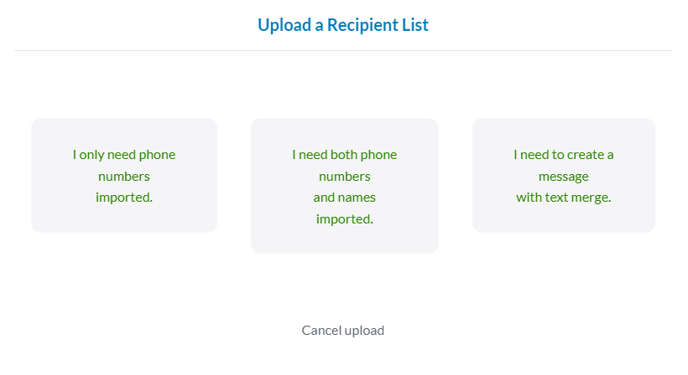
When uploading recipients you can choose:
1. I only need phone numbers imported: This option allows you to upload a csv. xlsx. or txt. file in any format. Or you can just paste in any amount of data from your clipboard. Then we’ll scrape what you’ve uploaded and identify all the phone numbers.
2. I need both phone numbers and names imported: This option allows you to import a list of numbers and names. We’ll save the names so that if that recipient texts you back you know who it is. This list must be in a very specific format. Follow the guidelines below.
File type: .csv
- Phone numbers in left most column
- Names in the second column
- No data in any other columns
- No header row
- No commas in phone numbers or names
Big tip, include your own cell number at the end of your list so you can test your campaign.
3. I need to create a Custom Message (formerly Custom Merge): This option lets you use customizable fields to personalize each message to the individual receiving it.
File type: .csv or .xlsx file containing merge data
Formatting requirements:
- Column names in first row
- Phone numbers in first column
If your file is not in the correct format, it will not upload correctly.
5. Write out your message
Compose the message you want to send to all your campaign recipients.
You are required to include in this message which organization or political campaign you are sending from.
Pay attention to the character counter under your message box. The counter gives you a number of texts your message will count as towards your pre-purchased bucket. This is a per-recipient number, so if your message counts as 2 texts, and you send it to 1,000 recipients that will be 2,000 texts towards your bucket.
BEFORE YOU START: Every time you text a contact, an opt-out notice will automatically be attached to the end of the message. This notice is STOP2END and is 10 characters long. So, it will add 10 characters to your overall message (which can be 160 characters before it counts as a second text).
If you want only one text counted toward your Peer to Peer usage per contact, you need to account for this opt-out notice by keeping the rest of your message at 150 characters.
This is where you can also add a Template (with or without Merge Fields), attach an image to your message, and schedule your message for a future time.
Note: The scheduled time selected will be when we start sending your message.
6. Confirm and Create
Before we create your campaign you will need to review everything you’ve done up until this point.
We highly recommend double-checking your message to ensure there are no typos and that any links work as expected.
Once you click on the Create Campaign button everything is locked in and cannot be changed.
7. Wait for Set Up
We’ll start setting up your campaign as soon as you create it, but depending on how many recipients you have this can take a little while.
The campaign will appear on the Current Campaigns page with the status Setting Up, until it is ready to go.
Once set up is complete this status will switch to Ready to send, and you can begin sending Peer to Peer campaigns.