Chrome is a web browser made by Google and is the backbone of the Edge browser. (Click here to download Chrome if you haven’t already.)
A Chrome extension is a software program added to your browser that lets you text from any page on the web, and respond to messages in your Queue.
Below we'll cover what all you can do with the Text Request Chrome extension, plus how to install it.
To install the Chrome Extension:
1. You must be using Chrome browser
2. Click this link to open our extension in the Chrome store
3. Click the blue Add to Chrome button in the top right of the screen
4. The extension will be added to your browser, and you’ll see Text Request’s green Q icon in the top right corner of your browser
5. Refresh your browser
6. Click the Q to open the extension (you must be viewing a web page other than app.text.request.com, the Chrome store, or the New Tab default screen)
7. Login with your Text Request username (email) and password
8. Open and close the extension by clicking the green Q icon
What does the Text Request Chrome extension do?
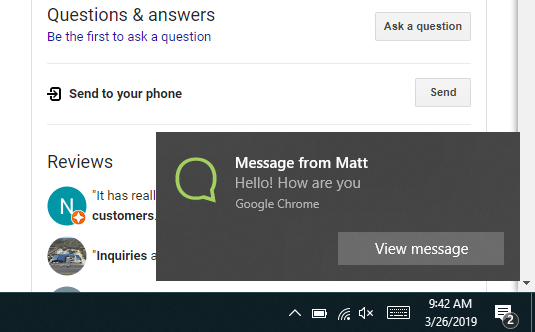
1. Get and Dismiss New Message Notifications
Once logged into the Chrome extension, you will get new message notifications for all text lines you have access to, which look like this:
Browser:

Text lines:
.png?width=100&name=Screen%20Shot%202021-07-19%20at%209.49.37%20PM%20(1).png)
Notifications will disappear whenever you view or refresh the Queue that received a new message. Notifications are not affected by other users’ activity.
2. Text From Anywhere On the Web
Anytime you hover your cursor over a phone number on a web page, it will become textable.
Simply move your mouse over to the green Q icon that appears next to it, click it, and then your Chrome extension will open a new window for you to text the contact.
3. Send Individual Messages
There are three ways to send a message using the Chrome extension.
The first is by selecting the Q icon next to a phone number you hover your mouse over.
The second is by clicking the Compose Message button at the bottom right of the extension.
The third is by clicking on the body of the message you want to respond to.
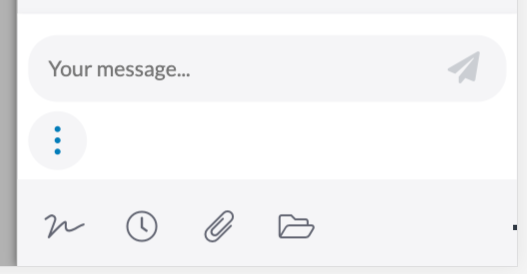
Before you hit send, you can select the icon with three dots to open a mini menu where you can:
- Add a pre-saved signature to your message by selecting the signature icon
- Schedule the message for a later date by selecting the clock icon
- Attach an image or PDF by selecting the paperclip icon (this will count as a separate message)
- Choose from existing message templates by selecting the folder icon
- Attach emojis using the emoji icon or pressing the Windows Key + the period key (.) on Windows devices and the control + command + spacebar keys for Macs.
4. Send Group Messages
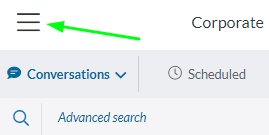
1. Select the three dashes at the top left corner of your Chrome extension
2. Go to the Group Messages section
3. Select the New Group Message button
4. Pick the contacts or group you wish to send to
5. Check the boxes confirming that a) you have permission to send messages to these contacts and b) that you understand they will receive the option to opt-out of messages
6. Compose the message you want to send
7. (Optional) Select any signatures, scheduled sending times, pre-made templates, or attachments you'd like to add
8. Review any suggestions our Spam Scanner recommends to help keep your message from being marked as spam
9. Confirm you're ready to send the group message
5. Toggle Between Text Numbers
If you have access to more than one text number, you can toggle between them by selecting the arrow at the top of the extension.
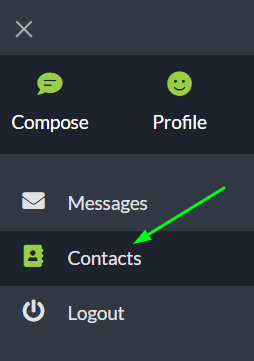
6. Add a Contact
1. Select the three dashes at the top left corner of your Chrome extension
2. Go to the Contacts section
3. Select the Add Contact button
4. Type in the contact's phone number and select the Create Contact button
5. From there you'll be able to enter the contact's details, including:
- First, Last, and Display Name
- Status
- Custom Fields
- Contact Tags
- Group Membership
- Notes
7. Edit a Contact
Click on a contact's name to edit and save their info. There are two places you’ll see a contact’s name (or phone number, if you haven’t saved them yet).
The first is in the Contact's section of your Chrome extension (which you can reach by selecting the three dashes at the top left corner of the extension).

The second is in that contact’s conversation thread.
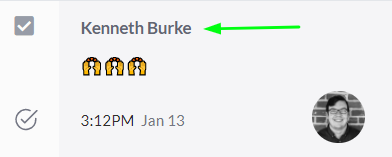
After clicking on the contact's name or number, their Details page will open and you'll be able to edit the contact's:
First, Last, and Display Name: In addition to the contact’s first and last name, you’ll also have the option to pick a display or preferred nickname. This display name can give context to who the contact is (for example, if your contact is in home service business, they may have a display name like “Keaton - 100 Georgetown Dr, 39845”)
Status: Shows whether the contact is active, archived, blocked, or another status
Custom Fields: Allows you to add custom details for each contact, like address or birthday
Contact Tags: Shows who's responsible for the contact
Group Membership: The groups the contact currently belongs to
Notes: Any additional information you’d like to include about the contact

The only thing you cannot edit about a contact is their phone number. Phone numbers are unique identifiers in Text Request, and cannot be changed.
If you need to update a contact’s phone number, you can Archive the current contact, and create a new contact using the updated phone number. You can only choose to delete an incorrect number if it has no message history.
8. View a Contact's Stats
1. Select a contact's name or number
2. Select Contact Stats

The contact's Stats section will the open, and you'll be able to view their:
- First date of contact
- Last date of contact
- Number of messages sent
- Number of messages received
- Response rate
- Average response time

A response counts as any text a contact sends in response to a message you sent within a 24 hour period. Their reply only counts toward the last message you sent—so if you send multiple messages, and the contact only replies to the last one, the other messages aren't counted toward your response rate.
It's also worth noting that some of your messages will have naturally low response rates. For example, if you text your contacts "Hey all, just wanted to let you know we'll be closed for Memorial Day," you're most likely not going to get a high response rate for that message.
9. Create and Manage Contact Tags
Contact Tags help you categorize contacts and give you another way to filter them. For instance you might create contact tags to organize which rep is working with that contact, or which stage of the sales funnel they fit into.
To create a new Contact Tag within the Chrome extension:
1. Select the three dashes at the top left corner of your Chrome extension
2. Go to the Contacts section
3. Select Manage
4. Select the New Contact Tag button
5. Name the tag and assign the color you want it to have
10. Create Groups
Groups are a great way to organize contacts by things like their date of last contact, use cases, seasonal needs, etc.
To create a group:
1. Select the three dashes at the top left corner of your Chrome extension
2. Go to the Contacts section
3. Select Groups
4. Select Add Group
5. Type in the name you want to give the group and select the Create Group button
11. Manage Your User Profile
1. Select the three dashes at the top left corner of your Chrome extension
2. Go to the Profile section
3. From there you'll be able to view your account info, edit your profile details, and manage your user preferences
12. Create and Edit Custom Fields
Custom fields allow you to save general facts about your contact (like their birthday or favorite sports team) to help you better remember your contact on a more individual basis. You can create as many custom fields as you want.
To view custom fields:
1. Select the three dashes at the top left corner of your Chrome extension
2. Go to the Contacts section
3. Select Manage
4. Select Custom Fields
You can create a new custom field by selecting the New Custom Field button.
You can edit an existing custom field by hovering over their name and selecting the pencil icon.
Any changes you make to a custom field's name will automatically be made across all of your contacts, so be sure to update their information accordingly. For example, if you change a custom field category name from “Favorite Color” to “First Job,” the custom fields that you entered favorite colors for will still have that information in that slot.
13. View and Download Contact Export History
Export histories give you detailed information about contacts you've exported in one spreadsheet, including:
- First contact date
- Last message sent
- Last message received
- Total number of messages sent
- Total number of messages received
- Total number of messages responded
- And the history of their contact status
To view your export histories:
1. Select the three dashes at the top left corner of your Chrome extension
2. Go to the Contacts section
3. Select Manage
4. Select Export History
5. Select the download icon next to the report you want to view
14. View and Download Contact Import History
Import histories help you determine how many textable contacts were in a list you recently imported.
To view contact import history:
1. Select the three dashes at the top left corner of your Chrome extension
2. Go to the Contacts section
3. Select Manage
4. Select scroll to the right and select Import History
Each report will be listed by the date it was imported and the number of contacts in the list.
Selecting the magnifying glass next to the import will show you how many new contacts were created from it, how many numbers already existed in your dashboard, and how many of the contacts are on a do not contact list.
15. Create and Manage Payment Requests
By default, Payments will be disabled on all dashboards for an account and must be enabled on a per-dashboard basis. Learn how to activate and set up Payments here.
Once Payments is set up, you can view your payment request histories, filter your payment requests, request payments, and change your Payment feature settings using the Chrome Extension.
Note that any Payment Requests made during Training Mode will be delivered, but money cannot be processed until you enter Live Mode. Click here for our guide on how to complete Payment Set Up and enter Live Mode.
To create a payment request using the Chrome extension:
1. Select the three dashes at the top left corner of your Chrome extension.
2. Go to the Payments section.
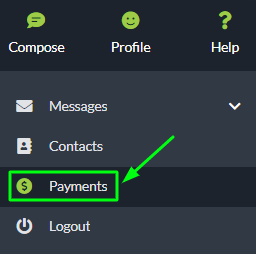
3. Select the Payments dropdown menu.
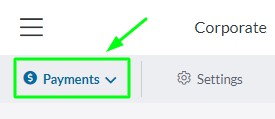
4. Scroll to the right until you reach the Request Payment option.
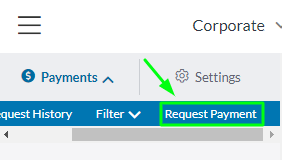
5. Select the contact’s phone number, the amount of money you want to request, a description of what product or service the payment is for, an optional reference number, and the message you’d like to send along with the request.
6. Select either Send payment request now or Schedule payment request later.
You can use this same menu area to view your Payment Request History and Filter your requests.
To edit the Settings section of your Payments menu using the Chrome extension:
1. Select the three dashes at the top left corner of your Chrome extension
2. Go to the Payments section
3. Select the Settings option

From there you'll be able to edit your Payment feature's settings the same way you would from within your account.
