Importing contacts to your address book requires a spreadsheet in a CSV (Comma Separated Values) format. Microsoft Excel or Google Spreadsheets tend to work best when creating a CSV.
Setting Up Your Spreadsheet
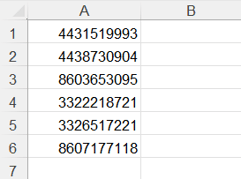
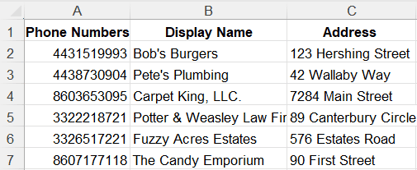
Phone numbers should be in column A, and any other information you want to import should be in column B and beyond. If you have a CRM contact list, pull these contacts from that list.
Quick Import Example Detailed Import Example
Once your spreadsheet is formatted correctly and saved as a CSV file, import the sheet by going to the Contacts menu in your dashboard. Then click Import under the View Contacts section.

You will then be given the option to choose either Quick Import or Detailed Import.
Quick Import — This option uses a spreadsheet (.csv or .xlsx file) to import only phone numbers to your contacts.
Detailed Import — This option uses a spreadsheet (.csv or .xlsx file) to import phone numbers, names, and any other custom fields you wish to add.
If you’re having trouble importing your file, remember these three troubleshooting steps:
1. Phone numbers must be valid and formatted as 10-digit long mobile numbers.
2. Get rid of blank cells in the middle of the phone number column.
3. For Detailed Imports, the first line of your spreadsheet (usually 1) must have data or the system will not recognize the column as information that needs to be imported.
Option 1: Quick Import
To import contacts using Quick Import:
1. Click Quick Import.
2. Choose the .csv or .xlsx file with the contacts you want to import, or copy and paste your numbers directly into the Copy and paste field.

3. Click the dropdown arrows to choose any Groups or Contact Tags you'd like the new contacts to be associated with.
4. Click Import.

Option 2 — Detailed Import
To import contacts using Detailed Import:
1. Click Detailed Import.
2. Choose the .csv file with the contacts you want to import.

3. Click the Assign dropdown arrows to assign any data points to the Custom Fields you have in Text Request.
4. Click Confirm Mapping.
5. Choose whether you want to Update Duplicates found within your file or not. You can also add Groups and Contact Tags at this stage.
6. Click Import.

You can further customize your contacts by adding Contact Tags and Custom Fields.
Importing Contacts into a Group
You can also import an entire list of contacts into a selected group. This is great for easily updating group membership without having to manually select and add already imported contacts.
The same contact list can be imported into the Contacts section and a group. Duplicates will not be created, and any contacts already within Text Request will simply be added to the designated group.
To import contacts into a group:
1. Go to the Contacts section of your menu.
2. Select Groups.
3. Select the group you want to import contacts into.
4. Select the Members tab.

5. Select Import.
Import History
If you ever need to view your import history, simply click on the Manage tab and then Import History. This will give you a list in chronological order based on when you imported contacts, and display the number of contacts that were added in that import.

Click on the Magnifying Glass to view more details of the import, including any numbers that already existed in your contacts, and any numbers that are on a Do Not Contact List.

Contact List Cleaning Services
If you need help cleaning up your contacts list or just don't have the time, we're happy to help. This service is available for all customers and only requires a properly formatted spreadsheet (.xlsx or .csv) of your contacts sent to support@textrequest.com.
Proper format:
-
Column A: Contact phone number
-
Column B: Contact name
Contact names are optional, so if a number does not have a name associated with it, you can still include it in the list.
That's it! No other data is needed. If additional information is included, it will be removed and you will receive a reminder about what the proper format looks like so we can get your list cleaned up.
Pricing for this service is $10/1000 contacts and the turnaround time is about 1 business day.