This is useful for texting from multiple dashboards under one Hubspot account. You can also text multiple leads and customers directly within your Hubspot account using the Text Request Chrome extension.
Additionally, Send Message Triggers can be added to Contact-Based Workflows in HubSpot.
Only contacts that already exist within HubSpot will be textable. Any contacts' phone numbers that only exist within Text Request will need to be manually added to HubSpot, and any messages prior to the sync will not be included. Syncing starts with messages sent after the integration is turned on.
Note: The HubSpot integration is a one-way street for changing contact information, including opt-outs. Contact information updated in your HubSpot account will automatically appear in Text Request, but any changes you make in Text Request will not impact your HubSpot account.
All dashboards within your Text Request account can use this integration. For example, 10 reps could text from 10 unique dashboards under the same account. You just need an admin level user within both Text Request and HubSpot to set the integration up.
To set up the HubSpot integration:
1. Go to Integrations.
2. Select Set Up within the HubSpot box.
3. Select Connect to Hubspot.
4. A new window will open asking you to login to HubSpot and select the account you’d like to integrate Text Request with.
5. Select Choose Account once you’ve found the HubSpot account you’d like to integrate.
To edit the dashboards that are in sync with this integration:
You can choose all or a subset of dashboards to sync.
1. Click Settings within the HubSpot integration box.
2. Select either selected dashboards or all dashboards.
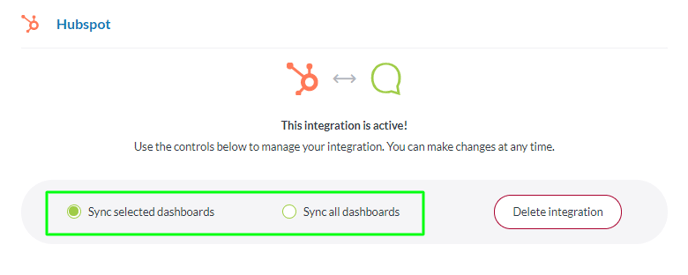
3. If you selected sync selected dashboards, check the dashboards below that you prefer to be synced.
You can uncheck any dashboards that you no longer wish to have synced at any time by following these steps (without disconnecting the entire integrations).
Workflow Actions
Once this integration is active, the action Send Message Trigger will automatically be available when you create Contact-Based Workflows in HubSpot.
At any point in your Contact-Based Workflows, you can add a Send Message Trigger, which will send a text message template to contacts that meet your Workflow criteria.
You have the option for messages to be sent from any of your Text Request dashboards, and you can associate a Text Request dashboard with a HubSpot Contact Owner.
To add a Send Message Trigger to Contact-Based Workflows:
1. Open your desired Contact-Based Workflow in Hubspot under the automation tab.
2. Select + next to where you want the Send Message Trigger in your Workflow.
3. Select the Send Message action item under the Text Request section (you can add multiple ones to the same Workflow).
4. Compose the message you want the contact to receive when the workflow is triggered, including any contact tokens you want the message to include.
5. Choose which dashboard you want these messages to send from.

There are two steps to this:
The first is choosing a Default Dashboard—which is the Text Request dashboard all texts will send from as the default option, if no other dashboard is chosen.
The second is choosing whether or not to send messages from the Contact Owner's dashboard, if applicable, or to always send these messages from the selected Default Dashboard.
We’ll cover how to associate Text Request dashboards with Contact Owners next.
6. Click Save.
7. Add more Send Message Triggers as desired throughout the Workflow
8. Click Review and Publish when ready.
To associate a Text Request dashboard with a HubSpot Contact Owner:
1. Click Settings within the HubSpot integration box.
2. Click Set up under Workflow Actions.
3. Select the dashboards that match with the corresponding Contact Owner in HubSpot.
4. Select Save once you’ve finished matching all your desired dashboards with their corresponding Contact Owners (you don’t have to pick one for every owner).
Disconnect the HubSpot Integration
When you no longer wish to use the integration, you can disconnect it by following these steps:
1. Go to the Integrations section of your menu.
2. Locate the Hubspot integration box underneath the Everyday Tools section.
3. Select Settings within the HubSpot box.
4. Select the "Delete integration button" on the new page that appears.
5. A new window will open asking you to confirm that you’re sure you’d like to delete the integration.
Once this integration is deleted, messages will remain within the Hubspot contact, but no new messages will be synced.
You may reconnect this integration at any time to begin syncing new messages again.