This is useful for texting from multiple dashboards under one FranConnect account. You can also text leads and customers directly within your FranConnect account using the Text Request Chrome extension.
Only contacts that already exist within FranConnect will be textable. Any contacts' phone numbers that only exist within Text Request will need to be manually added to FranConnect, and any messages prior to the sync will not be included. Syncing starts with messages sent after the integration is turned on.
Note: The FranConnect integration is a one-way street for changing contact information, including opt-outs. Contact information updated in your FranConnect account will automatically appear in Text Request, but any changes you make in Text Request will not impact your FranConnect account.
All dashboards within your Text Request account can use this integration. So, for example, 10 reps could text from 10 dashboards under the same account. You just need an admin level user within both Text Request and FranConnect to set the integration up.
How do you set up this integration?
1. Go to the Integrations section of your Text Request menu
2. Locate the FranConnect integration box underneath the Everyday Tools section
3. Select Set Up within the FranConnect box
4. Enter your FranConnect Company Code on the new page that appears, and select Connect to FranConnect
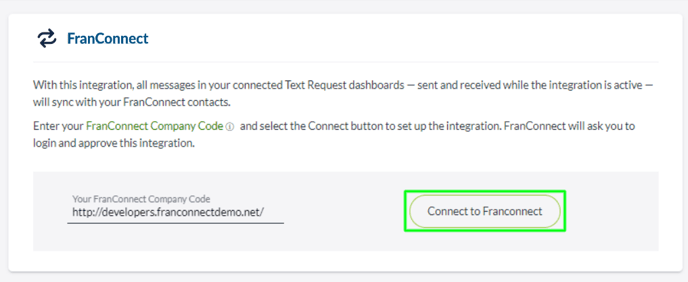
7. A new window will open and ask you to log in to your FranConnect account so you can grant Text Request access to it
8. Select “Choose Account” once you’ve found the FranConnect account you’d like to integrate
To edit the dashboards that are in sync with this integration:
1. Go to the Integrations section of your Text Request menu.
2. Locate the FranConnect integration box underneath the Everyday Tools section
3. Select Settings within the FranConnect box
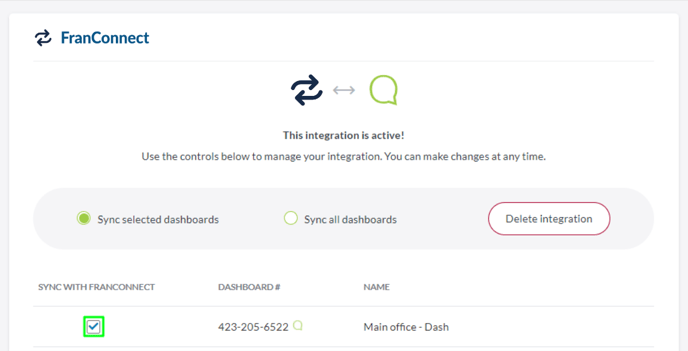
4. Select between syncing selected dashboards or all dashboards
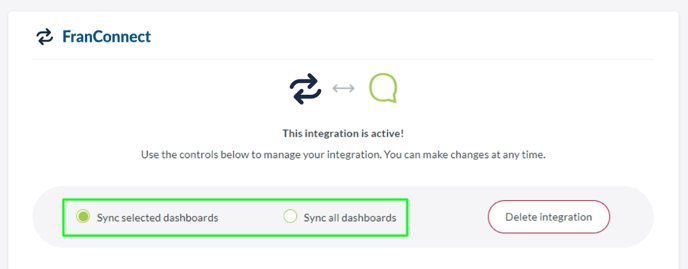
5. If you selected sync selected dashboards, check the dashboards below that you prefer to be synced

How do you disconnect this integration?
When you no longer wish to use the integration, you can disconnect it by following these steps:
1. Go to the Integrations section of your menu
2. Locate the FranConnect integration box underneath the Everyday Tools section
3. Select Settings within the FranConnect box
4. Select Delete integration on the new page that appears
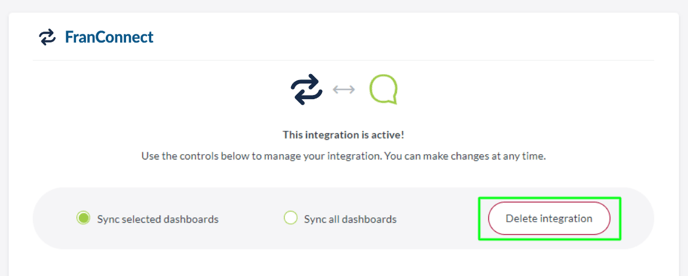
5. A new window will open asking you to confirm that you’re sure you’d like to delete the integration
Once this integration is deleted, messages will remain within the FranConnect contact, but no new messages will be synced.
You may reconnect this integration at any time to begin syncing new messages again.
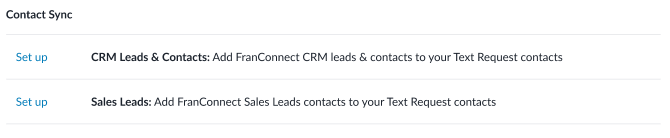
Contact Sync
The Contact Sync feature in our FranConnect integration allows you to add sales leads and CRM leads from your FranConnect account to your Text Request contacts list. Sales leads and CRM leads are separate, so you can sync just one, or both, whenever you want. You can also choose which dashboards you want this feature active on.
To set up CRM Leads & Contacts:
1. Go to the Integrations section of your Text Request menu.
2. Locate the FranConnect integration box underneath the Everyday Tools section.
3. Select Set up for either CRM Leads & Contacts or Sales Leads.
Note: At this point, you have a choice for syncing dashboards. You can either manually map dashboards with FranConnect locations or sync all dashboards with all locations.
4. Select Map dashboards with FranConnect locations.
4a. Open the Assign dropdown next to the dashboard you want to sync.
4b. Select the checkbox next to the location(s) you want to sync with this dashboard.
 4c. Click Select.
4d. Repeat the steps for all applicable locations and dashboards you wish to sync.

4e. Click Save.
5. Select Sync all dashboards with all locations.
5a. Click Save.
To set up Sales Leads:
1. Go to the Integrations section of your Text Request menu.
2. Locate the FranConnect integration box underneath the Everyday Tools section.
3. Select Set up for Sales Leads.
4. Select the various dashboards you want to enable this feature on or select the Sync all dashboards option if you want the feature on all of your dashboards.
5. Click Save when you’re done.
Once you’ve set up these features, you can edit them by going to Settings in the FranConnect Integration and selecting the edit button (pencil) next to the feature you want to edit.
FranConnect Text Workflows
Workflows allow you to create message templates using Merge Fields. Save time by creating message templates for leads that automatically incorporate their information, making for a more personal message. Designate which dashboard should send the message and then use the new message template with any of your workflows in FranConnect.
To create a text workflow:
1. Go to Settings for the FranConnect Integrations section of your Text Request menu.
2. Select + New Workflow under Franconnect Text Workflows.
3. Enter a name for your new workflow message.
4. Select which dashboard should send the message from the dropdown.
5. Create your message, including any relevant merge fields.
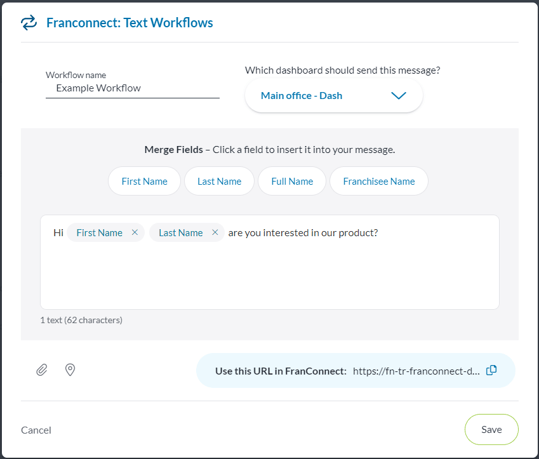
7. Click Save.
To add a text workflow to FranConnect:
1. Click the edit button (pencil icon) for the webflow text you want to use.
2. Click the URL to copy it.
3. Select Save or Cancel to exit the modal.
4. Open FranConnect.
5. Select CRM under Marketing.
6. Select Workflows.
7. Click Create Workflow.
8. Set up the workflow for how you want it to work and who you want it to include.
9. Select Configure Webhook URL for the Action.
10. Paste the URL you copied for your webflow text.
11. Click Associate & Save.
Once you've finished setting up the workflow and click Create, you'll be able to use your webflow text whenever you want in FranConnect. Any edits you make to the message in Text Request will be automatically updated in FranConnect.
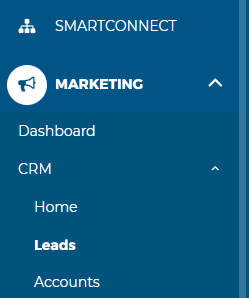
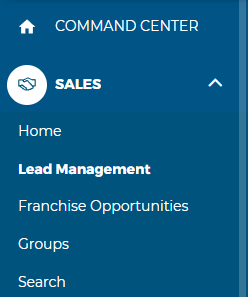
How do you access your leads in FranConnect?
In the FranConnect dashboard, go to the navigation bar to the left.
CRM Leads: Select the Marketing dropdown, then select CRM, and finally, Leads.
Sales Leads: Select the Sales dropdown, then select Lead Management.
CRM Leads Sales Leads