All dashboards within your Text Request account can use this integration. For example, 10 lawyers could text from 10 unique dashboards under the same account. You just need an admin level user within both Text Request and Clio to set the integration up.
Note: The Clio integration is a one-way street for changing contact information, including opt-outs. Contact information updated in your Clio account will automatically appear in Text Request, but any changes you make in Text Request will not impact your Clio account.
How do you set up this integration?
1. Go to the Integrations section of your Text Request menu
2. Locate the Clio integration box underneath the Everyday Tools section
3. Select Set Up within the Clio box
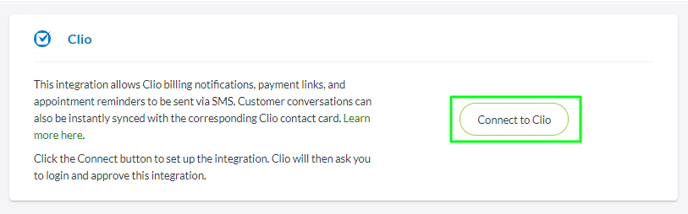
4. Select Connect to Clio
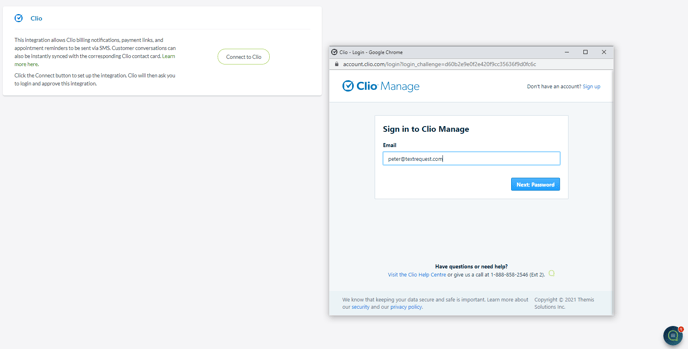
5. A new window will open and ask you to login to your Clio account so you can grant Text Request access
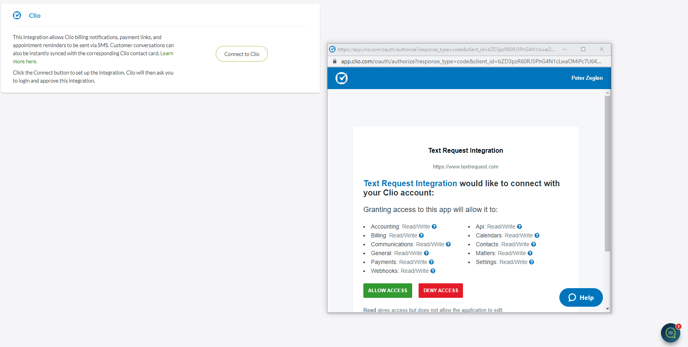
6. Once you login, select Allow Access
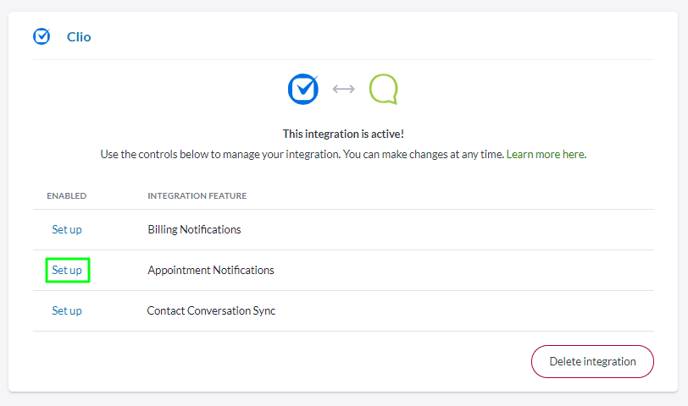
7. From there, the integration will be live, and different dashboards within your account can begin enabling billing notifications, appointment notifications, or contact conversation sync
How do you enable billing notifications?
When this integration feature is live, clients who have their phone number listed in your Clio account will receive a text message whenever you create a bill for them inside Clio.
To set it up:
1. Select Set up next to Billing Notifications

2. A new window will appear and ask you to select the dashboard you want the billing notifications to send from
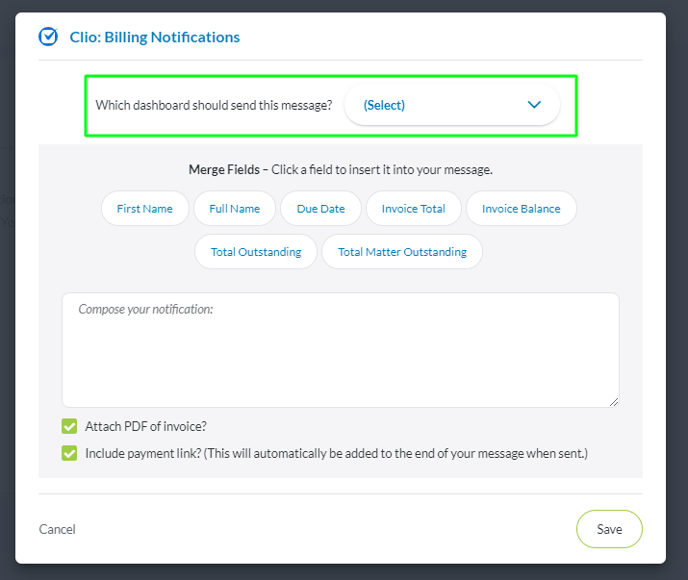
3. Compose the message notification you’d like to send to a contact (any custom fields you select will pull the information from your Clio account when the message sends, so make sure you have the information saved in Clio)
4. Check whether or not you would like to attach a PDF invoice, and whether or not you want to include a payment link (including a payment link only works if you have Clio Pay set up within Clio)
5. Select Save
You can edit or unlink billing notifications at any time by selecting the pencil and link icons respectively next to this integration feature.

How do you enable appointment notifications?
When this integration feature is live, you can send text message appointment notifications to attendees who have their phone number listed in your Clio account.
These appointment notifications include:
- Reminders a set time before the attendee's appointment (e.g. 30 minutes or 24 hours, whatever you prefer)
- Notifications for when the attendee's appointment is created
- Notifications for if their appointment is rescheduled
- Notifications for if their appointment is canceled
You can pick and choose which notifications you want the client to receive. For example, you could choose to only send appointment reminders, but not reschedule and cancellation notifications.
To set these notifications up:
1. Select Set Up next to Appointment Notifications
2. A new window will appear and ask you to select the dashboard you want the appointment notifications to send from
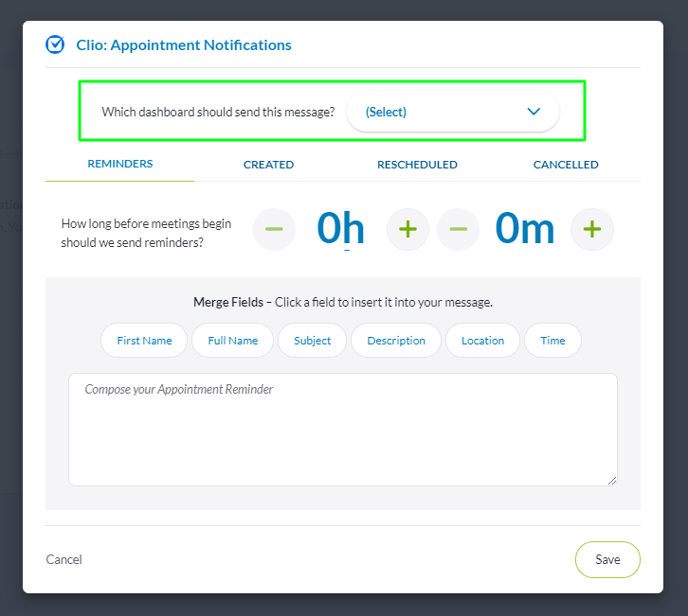
3. From here, you can begin creating the notifications you wish to send to clients
To set up appointment reminder notifications:
1. Have the Reminders section open
2. Choose how long before meetings you’d like for the reminder to send
3. Compose the appointment reminder you’d like to send to a contact (any custom fields you select will pull the information from your Clio account when the message sends, so make sure you have the information saved in Clio)
4. Select Save
To set up appointment creation notifications:
1. Select the Created section
2. Compose the appointment cancellation notification you’d like to send to a contact (any custom fields you select will pull the information from your Clio account when the message sends, so make sure you have the information saved in Clio)
3. Select Save
To set up appointment reschedule notifications:
1. Select the Rescheduled section
2. Compose the appointment reschedule notification you’d like to send to a contact (any custom fields you select will pull the information from your Clio account when the message sends, so make sure you have the information saved in Clio)
3. Select Save
To set up appointment cancellation notifications:
1. Select the Canceled section
2. Compose the appointment cancellation notification you’d like to send to a contact (any custom fields you select will pull the information from your Clio account when the message sends, so make sure you have the information saved in Clio)
3. Select Save
You can edit or unlink appointment notifications at any time by selecting the pencil and link icons, respectively, next to the Appointment Notification integration feature.
How do you enable contact conversation sync?
When this integration feature is live, all messages sent and received to your Text Request dashboards will sync with your Clio contacts.
Message sync starts with messages sent after the integration is turned on. Previous message history will not be included. Messages will only sync with contacts already existing in Clio. Any contacts that only exist within Text Request will need to be manually added to Clio before messages will sync with that contact.
To set it up:
1. Select Set up next to Contact Conversation Sync
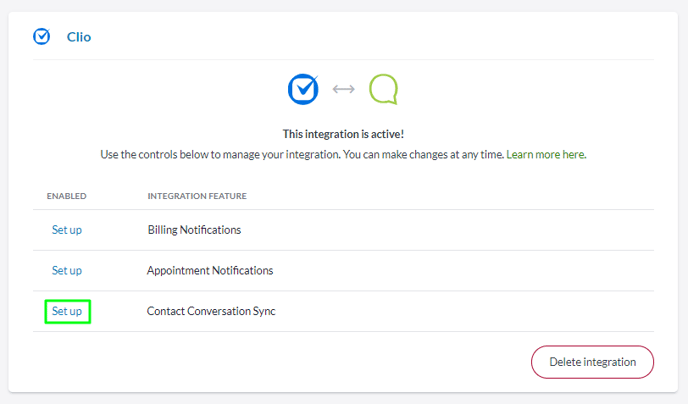
2. A new window will appear asking you to select between syncing selected dashboards or all dashboards
3. If you selected “sync selected dashboards,” check the dashboards below that you prefer to be synced.
You can uncheck any dashboards that you no longer wish to have synced at any time by following these steps (without disconnecting the entire integration).
How do you disconnect this integration?
When you no longer wish to use the integration, you can disconnect it by following these steps:
1. Go to the Integrations section of your Text Request menu
2. Locate the Clio integration box underneath the Everyday Tools section
3. Select Settings within the Clio box
4. Select the "Delete integration" button on the new page that appears
5. A new window will open asking you to confirm that you’re sure you’d like to delete the integration
Once this integration is deleted, all message syncing, appointment notifications, and billing notifications will stop.
You can reconnect this integration at any time by following the set up instructions above.
